

Arch Homelab - Self-Hosted Everything
Complete guide to building a self-hosted homelab with Arch Linux, MergerFS, SnapRAID, Docker, and automated media services
Build Your Arch Linux Homelab
Overview
This guide covers installing Arch Linux (LTS) and configuring it as a powerful home server. From base installation to containerized services, you'll build a complete self-hosted infrastructure that rivals commercial cloud solutions.
Requirements
What we're building:
- Unified Storage Pool: Combine drives of different sizes with a single mount point using MergerFS
- Hot-Swappable Storage: Add new drives without downtime or complex reconfiguration
- Data Protection: SnapRAID parity protection against drive failures
- Automated Backups: Scheduled backups of data and configurations
- Network Storage: NAS array accessible to all your devices
- Media Automation: Automated downloading, sorting, and tagging for movies, TV, music, and anime
- Personal Streaming: Self-hosted media server for family and friends
- Private Cloud: Your own cloud server accessible from anywhere
- Auto-Updates: Automatic service updates via Watchtower
- Easy Deployment: Containerized apps without dependency conflicts
Install Arch Linux LTS
Download Latest Arch Image
Install transmission torrent client:
sudo pacman -S transmission-cli --noconfirm
Start daemon:
transmission-daemon
Set download directory:
		sudo mkdir ~/Downloads/Torrents
transmission-remote -w ~/Downloads/Torrents
Download latest Arch ISO:
transmission-remote -a "https://archlinux.org/releng/releases/2024.09.01/torrent/"
Check download status:
transmission-remote -l
Remove the torrent after download:
transmission-remote -t all -r
Write Arch ISO to USB
Find USB device:
		for device in /sys/block/*
do
    if udevadm info --query=property --path=$device | grep -q ^ID_BUS=usb
    then
        echo $device
    fi
done
Write ISO to USB:
sudo dd bs=4M if=~/Downloads/Torrents/archlinux-2024.09.01-x86_64.iso of=/dev/sdX conv=fsync oflag=direct status=progress
Boot Arch Installer ISO
- Plug in USB and start server
- Enter BIOS (F2 on boot) and select boot menu
- Choose Arch USB Flash Drive
- Select "Arch Linux Install Medium" as primary boot device
Connect to WiFi (if no ethernet)
		iwctl station list
iwctl station $STATION get-networks
iwctl station $STATION connect $SSID --passphrase $PASSWORD
Archinstall
Run archinstall:
archinstall
Configuration (adjust to your needs):
- Mirrors: Mirror Region → United States
- Disk Configuration: Partitioning → best-effort → Select OS drive → filesystem: ext4 → separate home partition: yes
- Hostname: archnas
- User Account: Add a user
- Username: archie
- Setup password with pass manager:
pass generate archnas/archie - Superuser (sudo): yes
- Profile: Type → Minimal
- Kernels: linux-lts
- Additional Packages: git nano
- Network Configuration: Copy ISO
- Timezone: US/Eastern
- Chroot: no
- Reboot and remove install medium
Setup SSH Access
		# On the Server
sudo pacman -S openssh
sudo systemctl start sshd
sudo systemctl enable sshd

# On the client
ssh archie@<server_ip>
TODO: Add 2FA (reference) or disable SSH after setup
Install YAY Package Helper
		sudo pacman -S --needed git base-devel
git clone https://aur.archlinux.org/yay.git
cd yay
makepkg -si
cd ..
rm -rf yay
Additional Software
Install unzip utility:
sudo pacman -S unzip
Setup Drive Pool with MergerFS
Installation
		sudo pacman -S fuse --noconfirm
yay -S mergerfs --noconfirm
Find Disk IDs
Device mappings can change, so use disk IDs:
ls -al /dev/disk/by-id
Look for partition IDs (lines ending in -part1):
		ata-WDC_WD100EFAX-68LHPN0_2YK7S0GD-part1 (sdd1) (disk1)
ata-WDC_WD100EFAX-68LHPN0_JEK9DP8X-part1 (sda1) (disk2)
ata-WDC_WD101EFAX-68LDBN0_VCGN5M2P-part1 (sdc1) (disk3)
ata-WDC_WD100EFAX-68LHPN0_JEKX6VUZ-part1 (sdb1) (disk4)
ata-HUH721212ALE601_8HGL36YH-part1 (sdf1) (parity)
Update /etc/fstab
Important: Parity disk must be equal or larger than your biggest data disk
		# Data drives
/dev/disk/by-id/ata-WDC_WD100EFAX-68LHPN0_2YK7S0GD-part1 /mnt/disk1 ext4 defaults 0 0
/dev/disk/by-id/ata-WDC_WD100EFAX-68LHPN0_JEK9DP8X-part1 /mnt/disk2 ext4 defaults 0 0
/dev/disk/by-id/ata-WDC_WD100EFAX-68LHPN0_JEKX6VUZ-part1 /mnt/disk3 ext4 defaults 0 0

# Parity drive
/dev/disk/by-id/ata-WDC_WD101EFAX-68LDBN0_VCGN5M2P-part1 /mnt/parity1 ext4 defaults 0 0

# MergerFS pool
/mnt/disk* /mnt/storage fuse.mergerfs defaults,dropcacheonclose=true,allow_other,minfreespace=25G,fsname=mergerfs 0 0
Test Configuration
Save and reboot. Create a test file in /mnt/storage and verify it appears in one of the /mnt/diskX directories.
Setup SnapRAID
SnapRAID provides parity protection against drive failures.
Caveats:
- Parity drive must match or exceed size of largest data disk
- Parity is calculated on-demand via
snapraid sync(not real-time)
Installation
yay -S snapraid --noconfirm
Configure SnapRAID
Create/edit /etc/snapraid.conf:
		# Parity storage (must NOT be on a data disk)
parity /mnt/parity1/snapraid.parity

# Content files (need one copy per parity file plus one)
# Each must be on a different disk
content /var/snapraid.content
content /mnt/parity1/.snapraid.content
content /mnt/disk1/.snapraid.content
content /mnt/disk2/.snapraid.content

# Data disks (order is important for parity!)
disk d1 /mnt/disk1
disk d2 /mnt/disk2

# Exclusions
exclude /lost+found/
exclude .snapraid.content
exclude *.db-wal
Initial Sync
Run your first sync (this will take a while):
sudo snapraid sync
Automation with snapraid-runner
Clone snapraid-runner:
sudo git clone https://github.com/Chronial/snapraid-runner.git /opt/snapraid-runner
Create config at /etc/snapraid-runner.conf:
		[snapraid]
executable = /usr/bin/snapraid
config = /etc/snapraid.conf
deletethreshold = -1
touch = false

[logging]
file = /var/log/snapraid.log
maxsize = 5000

[email]
sendon = success,error
short = true
subject = [SnapRAID] Status Report
from = {your_email}
to = {your_email}
maxsize = 500

[smtp]
host = {smtp_host}
port = {smtp_port}
ssl = {true/false}
tls = {true/false}
user = {smtp_user}
password = {smtp_password}

[scrub]
enabled = true
percentage = 22
older-than = 12
Schedule with Cron
Run SnapRAID weekly (Sundays at 12:00):
		sudo pacman -S cronie
sudo EDITOR=nano crontab -e
Add:
0 12 * * 0 python /opt/snapraid-runner/snapraid-runner.py --conf /etc/snapraid-runner.conf
Test Drives Before Use
Always test drives before adding to your array, especially used drives:
S.M.A.R.T. Check:
		sudo pacman -S smartmontools
sudo smartctl -H /dev/sdX
Bad Blocks Check: See badblocks documentation
mkfs Bad Blocks: See mkfs.ext3 documentation
Container Setup with Docker
Install Docker
		sudo pacman -S docker docker-compose --noconfirm
sudo systemctl start docker.service
sudo systemctl enable docker.service
reboot
Test installation:
sudo docker run --rm hello-world
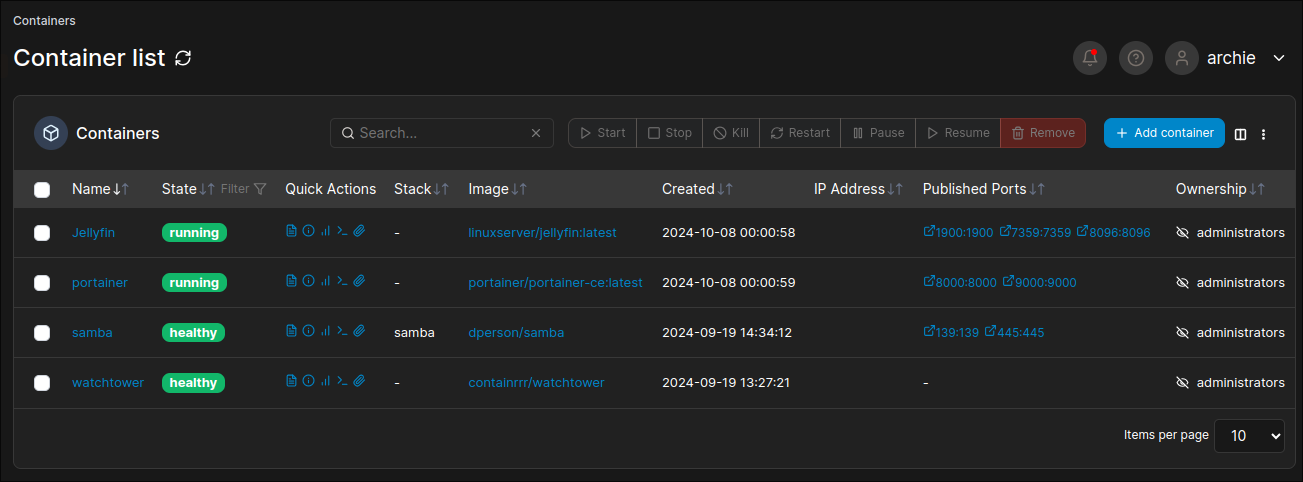
Portainer (Docker Web UI)
Manage containers through a clean web interface:
		docker volume create portainer_data
docker run -d --name=portainer
    -e PGID=1000
    -e PUID=1000
    -p 8000:8000
    -p 9000:9000
    --restart=unless-stopped
    -v /var/run/docker.sock:/var/run/docker.sock
    -v portainer_data:/data
    -v /mnt/storage/configs:/configs
    portainer/portainer-ce
Access at http://<server_ip>:9000
Docker flags explained:
-d: Run in background (detached)--name: Container name-e PGID/PUID: User/group IDs-p: Port mapping (host:container)--restart: Auto-restart policy-v: Volume mounts (host:container)
Watchtower (Auto-Updates)
Automatically update containers weekly:
		docker run -d --name=watchtower
    -e PGID=1000
    -e PUID=1000
    --restart=unless-stopped
    -v /var/run/docker.sock:/var/run/docker.sock
    containrrr/watchtower
    --schedule "0 0 4 * * *"
    --cleanup
To disable auto-update for specific containers:
--label=com.centurylinklabs.watchtower.enable=false
Samba (Network File Sharing)
Create Folder Structure
		cd /mnt/storage
mkdir configs private public

# Private/config permissions (owner only)
sudo chmod -R 770 configs private
sudo setfacl -R -d -m g::rwx configs private
sudo setfacl -R -d -m o::- configs private

# Public permissions (everyone)
sudo chmod -R 777 public
sudo setfacl -R -d -m g::rwx public
sudo setfacl -R -d -m o::rwx public
Deploy Samba Container
In Portainer, create a new stack named "samba":
		version: '3.9'

services:
    samba:
        image: dperson/samba
        container_name: samba
        restart: unless-stopped
        environment:
            - 'TZ=America/New_York'
            - 'USERID=1000'
            - 'GROUPID=1000'
            - 'SHARE1=public;/mount/public;yes;no;yes;all'
        volumes:
            - '/mnt/storage:/mount'
        ports:
            - "139:139/tcp"
            - "445:445/tcp"
        network_mode: bridge
        stdin_open: true
        tty: true
Access Samba Share
In file managers like Dolphin:
smb://<YOUR_SERVER_IP>/
TODO: Setup private access authentication
Jellyfin (Media Server)
Self-hosted alternative to Plex and Emby.
In Portainer, create a new container:
- Name: Jellyfin
- Image: jellyfin/jellyfin:latest
- Ports:
- 8096:8096 (HTTP interface)
- 7359:7359/UDP (Local discovery)
- 1900:1900/UDP (DLNA)
- Volumes:
/mnt/storage/configs/jellyfin:/config/mnt/storage/public/video/television:/data/television/mnt/storage/public/video/movies:/data/movies/mnt/storage/public/video/documentaries:/data/documentaries/mnt/storage/public/video/channels:/data/channels
- Environment:
PUID=1000PGID=1000TZ=America/New_York
- Restart: Unless stopped
Access at http://<server_ip>:8096
References
Nextcloud (Private Cloud)
In Portainer, create a new container:
- Name: Nextcloud
- Image: lscr.io/linuxserver/nextcloud:latest
- Ports:
- 443:443
- Volumes:
/mnt/storage/configs/nextcloud/config:/config/mnt/storage/Nextcloud/data:/data
- Environment:
PUID=1000PGID=1000TZ=America/New_York
- Restart: Unless stopped
Access at https://<server_ip>:443
Docker Compose Alternative
		nextcloud:
    image: lscr.io/linuxserver/nextcloud:latest
    container_name: nextcloud
    environment:
        - PUID=1000
        - PGID=1000
        - TZ=Etc/UTC
    volumes:
        - /mnt/storage/configs/nextcloud/config:/config
        - /mnt/storage/Nextcloud/data:/data
    ports:
        - 443:443
    healthcheck:
        test: curl --insecure --fail "https://localhost:443/login" || exit 1
        interval: 2m
        retries: 10
        start_period: 10m
        timeout: 5s
    restart: unless-stopped
Additional Services to Explore
- PhotoPrism/Immich: Self-hosted photo management (Immich docs)
- Gitea: Self-hosted Git server
- Homepage: Beautiful dashboard for your services (Homepage docs)
Conclusion
You now have a fully functional Arch Linux homelab with:
- Unified storage pool with hot-swappable drives
- Parity protection against drive failures
- Automated backups and maintenance
- Network file sharing
- Self-hosted media streaming
- Private cloud storage
- Containerized service architecture
- Automatic updates
Your homelab can now rival commercial cloud services while giving you complete control over your data and privacy.